Wednesday, December 28, 2011

Flower Fairies!

Blossom Fairy

December was a busy month! I completed three gorgeous fairy cakes for three sweet little girls! All of these little beauties are made from homemade gum paste and sit upon a decadent fondant covered cake. Also, the flowers and other adornments are edible and sculpted by me.

Fancy Fairy
This was my first time attempting to create a figure with a human face. It was not easy! Each petite face had to be colored, formed, sculpted and painted to give a realistic look. The biggest challenge was getting their eyes to look sweet and happy.
Orchid Fairy


I always enjoy making sugar flowers.  Orchids are my favorite flower because of their exquisite beauty .  these orchids taste as sweet as they look!

Thanks for reading!
Amanda

Saturday, November 26, 2011

Clowning Around!

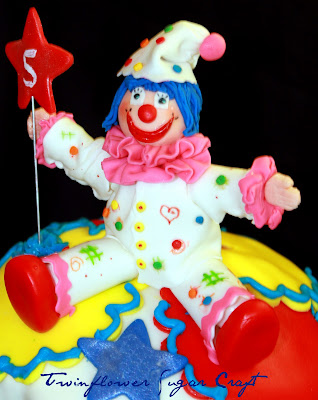
Ruffles the clown takes center stage of this fun birthday cake!  She is made from homemade gumpaste and fondant.  I sculpted the rough shape of her limbs and torso first and left them to dry while I worked on other parts of the cake.  When they were rigid enough to stay in place I began to make her clothes.  I rolled out the gumpaste to less than 1/16" thickness to obtain a realistic look of fabric.  The pink ruffles are also thin gumpaste cut into long strips and gathered together.  Ruffles' hands and face were by far the most challenging.  It took a bit of trial and error to achieve a fun and friendly clown face! 
The cake was a two tiered french vanilla sponge with dark chocolate filling.  The bottom tier was an 8" round and the second was a 6" petal cake.  I baked the petal cake with a slight dome top so that Rufles would have a nice place to sit.  The accents on the cake are all made from Twinflower Signature Fondant and additional details are piped with a cream cheese frosting.

The birthday girl loved her cake and so did all the other children!
Happy 5th Birthday Caroline!

Josh, Sally, Emily and Caroline Tabor

Thanks for reading!
Amanda

Friday, November 11, 2011

Baby Beluga

Baby Beluga is a lively children's song by Raffi.  The song has been made in to a book with brilliant illustrations that became inspiration for my sugar art.  I started with a 1/4 sheet cake.  After carving and filling the cake with chocolate fudge frosting, I then covered it in homemade fondant.  It is the fondant that became my canvas for the art.  Each and every element of the picture was hand painted with food coloring and gently carved or sculpted to enhance the image.  I used gumpaste for the type print . 
The children loved eating this delicious cake after watching a performance by Don Sinetti AKA The Sea Chantey.  Don performs in Sitka, AK each year to celebrate "Whalefest". 

Happy Whalefest!
Amanda

Sunday, October 23, 2011

Lambeth

Lambeth style cake
In 1934 Joseph Lambeth published a book called The Lambeth Method of Decorating Cakes.  The Lambeth method was popular in the UK for decades and it became popular in the US during the 1950's.  This time consuming and elaborate cake decorating style is now a lost art.  There are only a few professional shops in the US that even offer a true Lambeth cake. The Lambeth book has not been published since the '80's and is very rare.  A few copies can be found on the Internet but they sell for $500 - $700!  So, I gave it a try and only had pictures of cakes as a guide. 
The tools are very simple.  A pastry bag and a handful of tubes.  The method is not so simple!  I started by covering a cake in fondant.  I had to make sure the fondant was free of oils because oil breaks down royal icing.  Using a stick pin and a tape measure I divided the cake into 16 sections and marked it at several points.  I began by applying scrolls and borders with a small rope tube and then over piped them again with the same tube.  After the icing was set I went over them five more times.  Each time I used a slightly smaller tube.  I also added frills, strings and dots to further embellish the design.  Each element was over piped no less than three times.  Once all the icing had time to set I then painted the top layer with silver.  I used silver highlight mixed with vodka to create the paint. 
I thoroughly enjoyed creating this cake and I will do another.  I have so many ideas!  This style is very opulent and not for everyone but I love the way a Lambeth cake looks.  It is distinct, memorable and fit for royalty.   

close up of elaborate piping on Lambeth style cake
Close up of over piping and scroll work.  Most elements on this cake have been piped seven times over.  This creates the dimensional effect that is the mark of a Lambeth cake. By the time I got to the sixth layer my hands were shaking!

Top view of Lambeth style cake
Top view. 

Thank you for reading!

Amanda

Fondant Class


Over four evenings I taught the essential skills for creating a beautiful fondant covered cake.  Subjects covered included: making fondant, making butter cream, the science of cake baking, proper cake prep and decoration.  The six of us had a great time!  My students worked hard and overcame challenges that every cake decorator faces. 
Here are the finished cakes!  They look fantastic!  Three of the five students had never touched fondant before!  Nice work ladies.
I have plans to teach more classes.  Watch for updates and email me if you are interested.
Thanks for reading!
Amanda

Sunday, September 18, 2011

Two Peas in a Pod

Two Peas in a Pod
These two little cuties and their pea pods are hand formed from gumpaste.  They sit on top of a two tiered french vanilla cake that is filled with a luscious raspberry pastry filling.


Sweet Pea Cupcakes

Two dozen chocolate and vanilla cupcakes surround the cake canter piece.  Each has been filled with raspberry and topped with vanilla buttercream.  The top of every cupcake has been adorned with a piece of nature, a sweet pea blossom.

Baby shower cake for twins - two peas in a pod
The cake is covered is a delicious butter fondant.  The pink and blue bow, along with the other art work has been made from gumpaste.

Peas in a pod cake - with cupcakes

The table presentation was stunning!  Congratulations to the mom to be! 

Amanda

Monday, September 12, 2011

Have Your Cake and Cupcakes to!

What better way to celebrate a first birthday than with a beautiful cake and cupcakes too!  The mother of the birthday girl had decided on a theme of cupcakes but she wanted a traditional birthday cake as well.  Using her paper goods for inspiration I designed this cake for her.  The bottom is a very tall 8" round cake with a 4" round cake on top.  12 mini cupcakes surround the second tier and an over sized cupcake creates the third tier. 
The two round cakes are covered in fondant while all the cupcakes are topped with a buttercream swirl.  Finally, I made the "1" from homemade gumpaste.  All the cake is a moist vanilla cake with princess buttercream filling.
Happy 1st Birthday!

Amanda

Sunday, September 4, 2011

More Salmon!

The salmon are still making their way up the creeks, streams and rivers of Alaska!  Here is another celebration cake that features these favorite fish.  This time I chose butter cream for the cake finish.  The salmon were once again made from hand cut fondant and painted details. The purple starfish are molded from chocolate.  Moist butter vanilla cake and lemon butter cream make this cake one that anyone would love!

Sunday, August 28, 2011

Sitka Salmon

It is that time of year again!  The salmon are swimming up stream to spawn and then.....well you know ;(
Many people here LOVE salmon so why not celebrate with a few!

This salmon lover birthday cake is a 6 inch round with three layers.  The cake is a buttery vanilla and the birthday girl requested luscious lemon and coconut filling.  I crumb coated with lemon butter cream and finished the cake with my signature butter and cream fondant.  I used food coloring to paint the water ripples and I used color dusts to create the salmon on fondant cut outs.  The salmon are shiny silver with the help of silver hi-light dust.  The seaweed is had cut and textured from fondant and the sand is brown sugar. 

Swim salmon swim!  After all the rain we have had recently the creeks are full for the fish to make their final journey!

Amanda

Sunday, August 21, 2011

Diva-Licious

This cake is just as spicy on the inside!  A moist aromatic spice cake takes center stage for this creation.  I torted it with my signature butter cream and I infused a hint of caramel for the perfect balance of flavors.  Vanilla cream fondant gives this cake a sophisticated finish and creates the perfect palette for the finishing touches.

The zebra stripes are hand cut from tinted fondant. The bow is formed from homemade gum paste.  I cut and sculpt each loop and let them dry to a rigid texture.  I then use tinted white chocolate to glue the loops together.  Finally, the ribbon streamers are put into place to create a realistic effect. 

Here is the diva-licious beauty:

Saturday, August 6, 2011

"I can't surrender. I don't know how!" - Captain America

Dense buttery cake and cookies & cream filling will make you want another slice of this super hero cake!  Captain America's iconic shield is the main attraction of this work of art.  It is hand sculpted from two layers of cake and then covered in homemade fondant. The shield sits high up on an 8" round four layered cake.  I used homemade gum paste and fondant to create the artwork that adorns the base cake. 

Captain America Cake

Back of cake

Philip and his birthday cake!

Thank you for reading!
Amanda

Sunday, July 10, 2011

Old School Buttercream

We have a house full of company and I wanted to make a special dessert for everyone.  Whenever I have an opportunity to make a cake I try to expierment and practice new techniques.  I did not have any fondant prepared so I tried decorating a buttercream cake "old school" style. 

I piped the roses with a petal tip and a flower nail.  When I had completed several I left them in the freezer to harden.  This makes transferring them to the cake much easier.  The side of the cake is decorated with the cornelli lace pattern.  A dated but beautiful design. 

The cake was white with four interior layers.  I used marion berry frosting and almond mocha fudge.  The alternating layers meant it was beautiful on the inside too!

Saturday, April 30, 2011

Quilted Decadence

Tonight Brave Heart Volunteers are hosting a huge birthday party at the Channel Club.  The fundraising event includes an elegant dinner followed by a dance party with live music.  They are also hosting a birthday cake contest. 
I wanted to create an elegant cake with flair for this event.  I also wanted to include something that represents the Brave Heart Volunteer organization.  After a few sketches I decided upon a black and white theme with a red fantasy flower accent.  Quilting looks so beautiful on cakes and this was my opportunity to give it a try!

The cake is a rich chocolate cake from scratch with a vanilla buttercream.  I used marshmallow fondant to cover the cakes.  The heart and red flower are made from gumpaste. 


Come to the Channel Club tonight and support a great organization!
Amanda


Friday, April 22, 2011

Happy Easter!

Children LOVE these darling Easter bunny cookie pops!  I made these and sold them as a fundraiser for my girls' preschool.  I was surprised at how fast they sold and how much everyone loved them.  The bright colors make them look cheery for the spring.

I used my favorite sugar cookie recipe and stiffened it up with additional flower.  After I cut out the cookies, I inserted a sucker stick and baked. When  the cookies were cool I used royal icing to pipe a dam around the entire cookie.  After the dam set up, I used a thinned royal icing to flood the center of the cookie.  I let this dry for 24 hours before adding all of the detail work. The ears required a dam of white icing before I could flood with color.  When the color was set, I piped additional details on the ears.

Happy Easter!


Fly, Love and Sing

My dear friend Janie is expecting her second baby girl.  I made this cake for her shower and I used her nursery decor as inspiration.  I tried a painting on a cake for the first time.  It was fun to do and it looks great!  Janie LOVES nutella so I made a nutella buttercream to layer in the cake with a pound of fresh strawberries.  The bottom layer is a little crooked because of all the wonderful berries but it was worth it.  this cake was delicious!

I am a little late posting this cake!  In fact Grace Arren is already almost two months old!  Congratulations to The hall family on the birth of their beautiful little princess.


Wednesday, February 23, 2011

Monogram Cookies

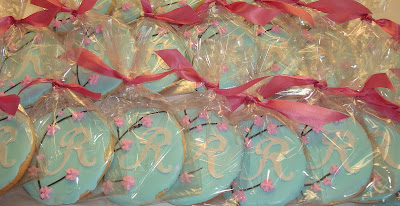
I was asked to make monogram cookies for an upcoming wedding.  I have never seriously decorated cookies before so this project took a lot of trial and error.  First was the cookie recipe.  The cookies had to be firm, hold shape in the oven and bake flat.  After trying several recipes I found one that worked and made 5 batches of dough to yield 60 large cookies with a few extra.  Next came the icing.  I needed something that would dry hard, look great and be duarable.  I knew royal icing was the way to go but it took a while to master consistacy for coverage and decorations.  Finally, the monogram!  There is no way I can pipe 60 monograms perfectly so I turned to my cricut cake.  After making the gumpaste, I rolled it out so thin that you could see through it and I let cricut do the rest.  Even though the machine did the cutting, this was a tedious and time consuming process. 

They ended up looking pretty good.  I was not thrilled with the end result but I have to remember that this was my first attempt with cookies.  Here they are:


I have to say that I enjoy making cakes much more than making custom cookies.  It is not fun to do the same thing 60 times over!

Thank you for visiting.
Amanda

Saturday, February 19, 2011

Cake With Style

Sitkans Against Family Violence is holding its annual fundraiser tonight and part of this event is a silent dessert auction.  I wanted to create a show stopper for this event with hopes that it will bring in a large sum of money for the organization.

This cake is the most complex yet!  I started by baking two 10" round white cakes and two 8" round white cakes.  I prepared two batches of butter cream, a double  batch of fondant and my favorite gum paste recipe.  That is over 12lbs of sugary topping for this cake!  Before I started on the cake, I made my gum paste roses.  Each flower was formed one petal at a time.  When they dried I dusted them with pink blossom tint and a bit of red pearl luster dust. 

Next came butter cream and cake carving.  I was a little nervous carving the purse from the 8" cakes but I measured twice and took my time.  It was a challenge to get the correct slope and keep the entire thing symmetrical.  Once carved, both cakes received a generous coating of butter cream. 

Covering the hat box in fondant went fairly quickly but the purse took nearly three hours to complete.  I wanted it to look realistic which meant details!  Hand painted stitching, gum paste handle and well place dragees for rivets completed this work of sugar art. 

Here it is!


Stop by ANB Hall tonight and bid on this gorgeous confection!

Amanda

Wednesday, February 16, 2011

Birthday Boy!

I just completed this cake for a young man's 12th birthday.  His mother asked that I include his two favorite activities soccer and swimming.  It was challenging to come up with a cohesive design for this two tiered cake but after a few different sketches I had a plan.However plans do not always work out!  At one point I completely tore apart the top layer and started over!  I used a lot of fondant on this cake.  I also used gum paste for the swimmer and gel for the water.  Inside was a dark chocolate cake with butter cream frosting. 

You should have seen the smile on his face when he saw his cake!  It made my day!

Enjoy!
Amanda

Saturday, February 12, 2011

Cupcakes fit for a Princess!

The USCG Spouse's association hosted a father daughter Valentine dance.  All the little girls were given tiaras to wear and they wore their favorite princess dresses.  The USCG ladies had the entire place decked out in hearts, pink and more pink.  It was so cute.  They even had a photo shoot area just like a prom. 

Of course I had to bake something amazing for all the little princesses! 
This basket is covered in over 50 mini cupcakes. 
Top view of the cupcake basket.

I enjoyed making this basket.  I completed the entire project while the twins were napping!  This one went smoothly and the results speak for themselves.

Thank you for reading!
Amanda

Friday, February 11, 2011

Valentine's Day Basket

Chocolate cake truffles are perfect for Valentine's day!  I made this basket for my former co-workers back in NJ! 

On the menu: Chocolate Raspberry, Chocolate Espresso and Chocolate Peanut Butter.

The PB truffles are topped with a dab of white chocolate and toffee bits.  The espresso are my favorite from this collection!  The chocolate covered coffee bean and dark chocolate drizzle really set them off.  Nnothing says Valentine's day like pink so, the raspberry truffles are all dressed up in pink chocolate and fun sprinkles!

Happy Valentine's Day! Amanda

Birthday Basket

A close friend asked me to create a cake truffle basket for her mother's birthday.  Her mom is a big fan of chocolate and peanut butter.  So, I made double chocolate cake truffles and chocolate truffles with a peanut butter center.  I will post the PB center recipe on my website.  It was fast, easy and delicious! 

After I dipped the truffles in chocolate, I added the special Twinflower touch!  I adorned them with tiny gum paste flowers, sterling silver and lavender luster.  I decorated a basket with fabric, ribbon and a few silk flowers.  The birthday girl loved her gift!


Thanks for visiting!
Amanda